misp-playbooks
- Introduction
- Architecture
- Installation
- Standard MISP playbooks from the GitHub repository
- Test the environment
Introduction
In general MISP playbooks are installed on a MISP server but you can also use them on a separate system. This can be beneficial if you want to deploy the playbooks in an ad-hoc fashion, such as during an incident investigation.
This guide (with sections from the technical documentation and MISP modules) walks you through installing MISP playbooks on a Kali Linux VM in the Azure cloud.
Architecture
The architecture
- Uses a Kali Linux VM in the Azure cloud;
- MISP playbooks are installed on the Linux VM;
- MISP modules are installed on the Linux VM;
- The access to Kali is via SSH (with key authentication);
- Playbooks are only accessible after logging in via SSH;
- Via SSH port forwarding (
-L 8899:127.0.0.1:8899)
- Via SSH port forwarding (
- The playbooks can interact with MISP;
- Via a reverse SSH tunnel (
-R 127.0.0.1:4443:192.168.1.123:443).
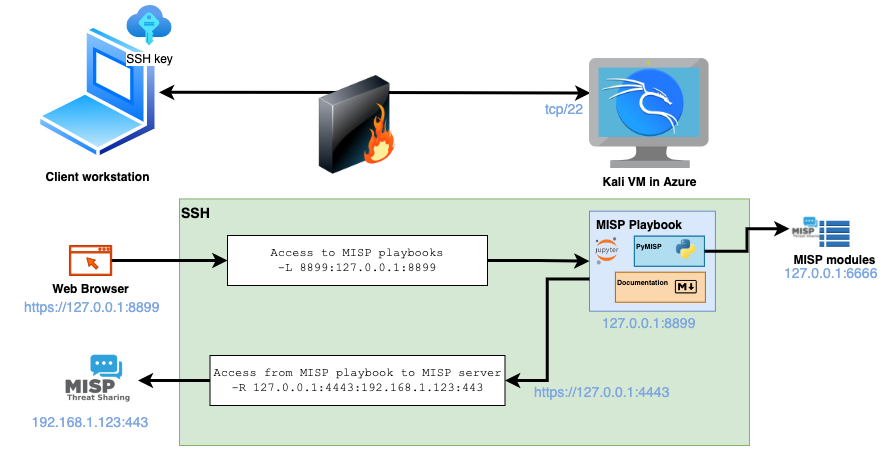
This setup does require that the client machine (from which you start SSH and the browser) has access to MISP.
Installation
Setup Kali Linux
In Azure, navigate to Virtual machines, click Create and choose Azure virtual machine.

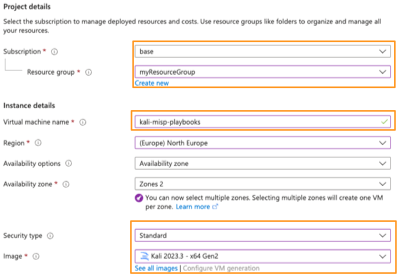
Then choose your Subscription and the Resource group. If you plan to use the machine for incident investigations then create a new -specific for the investigation- resource group. Give the virtual machine a name and choose the Kali 2023.3 image. Because of the Kali image you will need to set the Security Type to Standard.
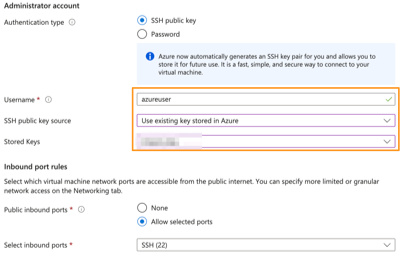
Under the Administrator account, keep the azureuser as username, choose SSH public key and create a new key pair or use an existing one. Allow inbound SSH traffic.
Then click Review + Create and confirm with Create. The deployment of the VM only takes a couple of seconds. When the deployment is finished, navigate to the VM resource and go to Settings, Networking, click on the line with “SSH” and change the inbound port rules. You can limit access to your IP or to an IP-range.
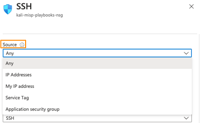
SSH with port forwarding and reverse shell
After the deployment, the public IP of the machine is displayed under Essentials in the Overview tab. Then login to the virtual machine with the public ssh key and setup the port forwarding and reverse tunnel. In this case
-L 8899:127.0.0.1:8899forwards the port 8899. In a later phase, JupyterLab will run on port 8899-R 127.0.0.1:4443:192.168.1.123:443creates a reverse tunnel from port 4443 (on the Kali host) to 192.168.1.123:443 (on the host starting the SSH connection). Replace 192.168.1.123 with the IP of your MISP server.
ssh -i keychain/mispcis_key.pem -L 8899:127.0.0.1:8899 -R 127.0.0.1:4443:192.168.1.123:443 azureuser@1.2.3.4
If all went well, you get the Kali Linux prompt.

Prepare the environment
Clone the MISP playbook repository from GitHub.
git clone https://github.com/MISP/misp-playbooks
cd misp-playbooks
Python virtual environment
All the playbooks are executed from a Python virtual environment. This allows you to have multiple versions of Python libraries installed, independent of those already provided by your Linux system or other installed projects. In this case we create the virtual environment (called playbooks) and activate this environment.
First update apt, then install virtualenv, create the virtual environment and install the necessary Python libraries.
sudo apt-get update
sudo apt install python3-virtualenv
virtualenv -p /usr/bin/python3 playbooks
source playbooks/bin/activate
pip install pymisp jupyterlab notebook
MISP modules
When playbooks are installed on a MISP server they can -in most cases- directly interact with the MISP modules. In this setup, on a separate VM, we have to manually install the modules. The MISP modules are used to do enrichments and create MISP attributes and objects. Install the Linux packages, clone the MISP modules repository and install the Python libraries for the modules in the same Python virtual environment used for the playbooks.
pip install misp-modules[all]
Test if the MISP modules start correctly.
misp-modules -l 127.0.0.1 -d
This should result in output similar to the one below.
...
2023-10-23 11:43:34,566 - misp-modules - INFO - MISP modules vmray_import imported
2023-10-23 11:43:34,567 - misp-modules - INFO - MISP modules csvimport imported
2023-10-23 11:43:34,568 - misp-modules - INFO - MISP modules server started on 127.0.0.1 port 6666
If the modules start correctly you can use the systemd script (an adjusted version from the MISP modules repository) to start the modules.
sudo cp config/azureuser-misp-modules.service /etc/systemd/system/misp-modules.service
sudo systemctl daemon-reload
sudo systemctl enable --now misp-modules
sudo service misp-modules start
Setup playbooks
Basic Jupyter configuration
The MISP playbook repository contains a basic Jupyter configuration file that you can use as a start to configure your environment. Move up one directory (assuming you were still in misp-modules). Create a configuration directory, copy the configuration file and create a directory for your notebooks.
mkdir playbooks/config
cp config/azureuser-misp-playbook-jupyter.py playbooks/config/misp-playbook-jupyter.py
mkdir playbooks/my-playbooks
SSL
It is a good idea to use SSL to encrypt the communication between your client (web browser) and JupyterLab. Create a self-signed certificate or use a valid certificate from services such as Let’s Encrypt. Strictly speaking the communication is already encrypted by tunneling the traffic over SSH. But using SSL now avoids unencrypted traffic if you ever decide to access JupyterLab directly.
openssl req -x509 -nodes -days 3650 -newkey rsa:2048 -keyout playbooks/config/playbook-ssl.key -out playbooks/config/playbook-ssl.pem
Password protect notebooks
Protect the access to your notebooks with a password. The MISP playbook repository contains a helper script that asks for a password and stores the hash in a configuration file with the variable ServerApp.password. Start the script tools/set_notebook_password.py from the Python virtual environment and provide it the earlier created configuration file.
python tools/set_notebook_password.py playbooks/config/misp-playbook-jupyter.py
Configuration check
Review the configuration file playbooks/config/misp-playbook-jupyter.py . Pay attention to the path used for root_dir and make sure c.ServerApp.ip is set to 127.0.0.1.
Systemd startup script
Copy the sample systemd (specific for the Kali Linux VM in Azure) script. Review the configuration of the systemd script, especially the values for User and Group and the paths in ExecStart. If everything looks good you can enable and start the daemon.
sudo cp config/azureuser-misp-playbook-jupyter.service /etc/systemd/system/misp-playbook-jupyter.service

sudo systemctl daemon-reload
sudo systemctl enable misp-playbook-jupyter.service
sudo systemctl start misp-playbook-jupyter.service
Verify that the service started without problems.
journalctl -u misp-playbook-jupyter
You should then get a message similar to the one below.
... ServerApp] jupyterlab | extension was successfully loaded.
... ServerApp] nbclassic | extension was successfully loaded.
Browser access
Now open your browser and navigate to https://127.0.0.1:8899. If all went well you get a web page asking you to enter the password you provided earlier.
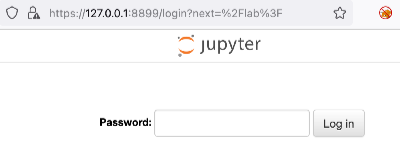
When you enter the password you should be greeted with the JupyterLab web interface.
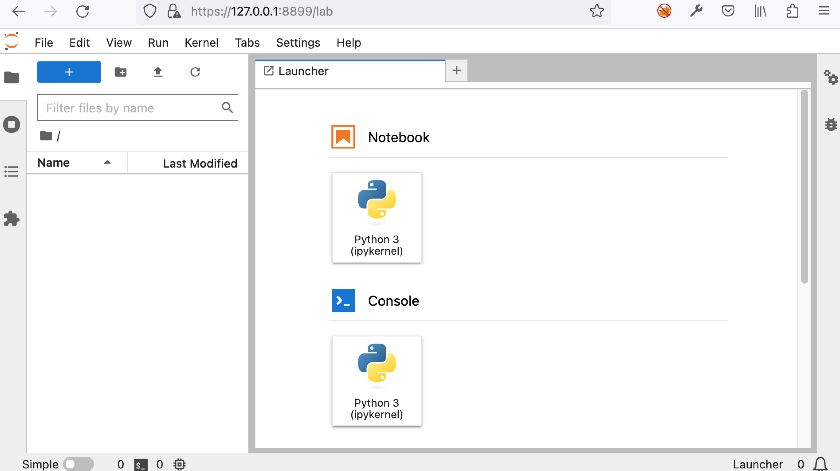
Configuration for MISP
Authentication key
The playbooks require a MISP API key and they will typically load the credential information from a keys.py file stored in the vault directory. First create the vault directory in your Python virtual environment (most likely playbooks) and add a keys.py file.
mkdir playbooks/vault
touch playbooks/vault/keys.py
A basic keys.py must have at least the below entries.
misp_url="https://127.0.0.1:4443/"
misp_key="APIKEY"
misp_verifycert=False
You can create a new MISP API key via the MISP web interface by navigating to Global Actions, My Profile and then choosing Authentication key. Provide a meaningful comment when you create the new API key. Then
- Add this key to keys.py (in
misp_key) - Update the MISP URL (in
misp_url). Because we use a reverse tunnel to get access to our MISP server, usehttps://127.0.0.1:4443(or the port you specify for the tunnel)
Standard MISP playbooks from the GitHub repository
Copy the MISP playbooks
The standard MISP playbooks are in the folder misp-playbooks. Copy these playbooks into your working directory.
cp -rp misp-playbooks/* playbooks/my-playbooks/
Install the libraries for MISP playbooks
Some MISP playbooks require additional Python libraries. You can install them with pip.
pip install -r documentation/requirements.txt
Test the environment
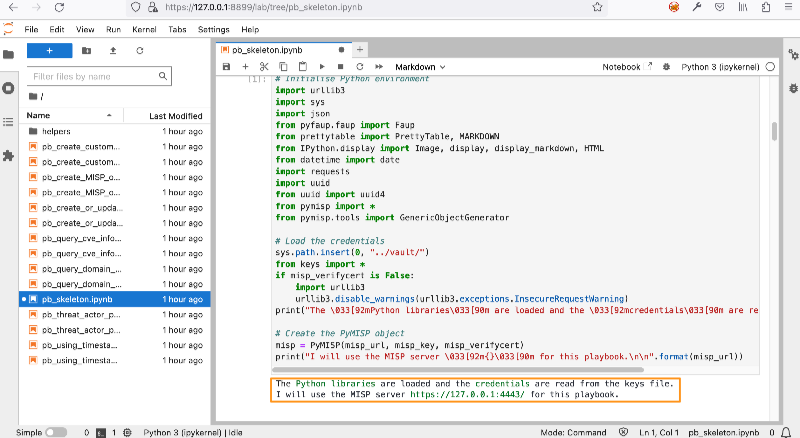
The easiest way to test that your environment is setup correctly is by using a copy of the pb_skeleton.html playbook. If you’re able to start the playbook then you know that the JupyterLab environment is setup correctly. After that, run the playbook to check if your connection to MISP is functional and if you can access the local version of the MISP modules.
